Help CenterBilling & Credits
How do I choose which stores to keep after a downgrade in the Shopify app?
7 min readIn the DS-Mate app inside Shopify Admin, on the **Billing** page that every page opens while you are over your limits. For the account owner, on any plan whose limits you are over: Free allows 1 store and no guests, Starter 2 stores and 1 guest, Growth 5 stores and 5 guests.
When your plan allows fewer stores or guests than you have, every page of the app opens "Store Limit Exceeded" (or "Guest Limit Exceeded" when only guests are over) and the app menu is hidden until you finish. Tick the stores to keep (the store you have open is always kept), remove extra guests if the app asks, type DISCONNECT and click Confirm and Continue. There is no deadline, and the stores you do not keep are disconnected, with their data kept for 60 days.
Steps
Schedule a downgrade on a plan billed through Shopify
- Click Billing in the app menu.
- Click Change Plan. The dialog "Change plan" opens. It reads "Choose a new plan. Your change will be applied with proration.", but a downgrade is not prorated: it is scheduled for the end of your billing period.
- Click Downgrade on the lower paid plan, or Downgrade to Free.
- The dialog "Schedule Plan Change" opens: "Your plan will change at the end of your current billing cycle. You keep your current plan benefits until then." Check "Current Plan:", "New Plan:" and "Effective Date:". For Downgrade to Free, "New Plan:" reads "Free (Monthly)" or "Free (Annual)". The note says Shopify will ask you to approve the new plan then (Free has no Shopify charge), and ends "You can cancel this scheduled change any time before the effective date."
- Click Schedule Downgrade, or Cancel to keep your plan as it is. Clicking Schedule Downgrade cancels your Shopify charge at once, and on a plan billed through Shopify the change cannot be undone in the app, although the note says you can cancel it.
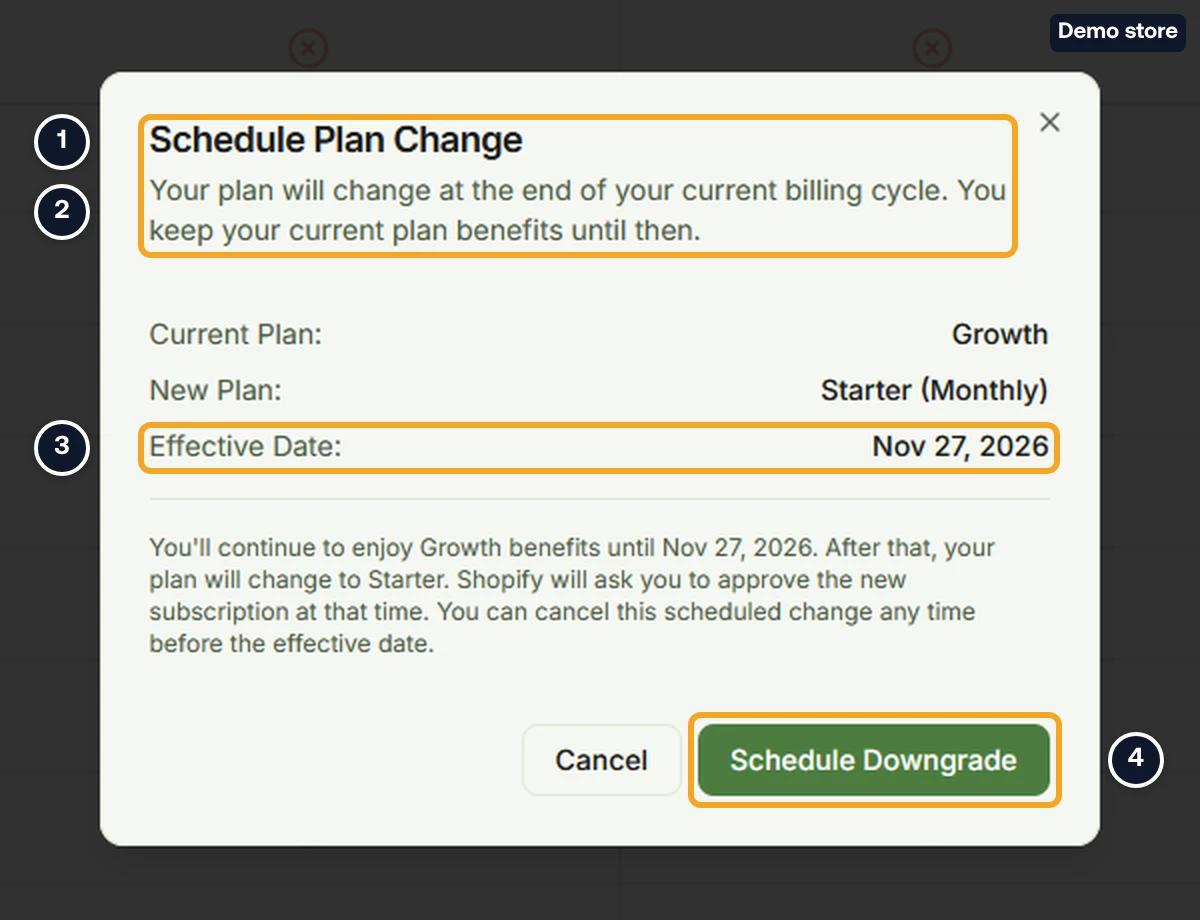
- The toast reads "Downgrade scheduled." with "Your plan will change at the end of the current billing cycle." If it fails, the toast reads "Failed to schedule downgrade." or gives the reason.
- Until the effective date, the Billing page shows "Plan Change Scheduled" with "Changing to <Plan> on <date>" and "Your <Plan> plan ends on <date>. After that you can subscribe to it again from your plans." It has no button to keep your current plan. In the plan dialog, the lower plan's card reads "Downgrade Scheduled".
If you pay by card through the web dashboard, see How do I upgrade or downgrade my plan? for scheduling and undoing a downgrade.
When the lower plan starts
- After the effective date, every page opens the plans with the banner "Your previous plan expired. Your scheduled <Plan> plan is ready to activate. Click the highlighted card below to approve Shopify billing and continue." The lower plan's card reads "Ready to Activate".
- Click Activate <Plan> on that card. If you have more stores or guests than that plan allows, the store and guest steps below open first.
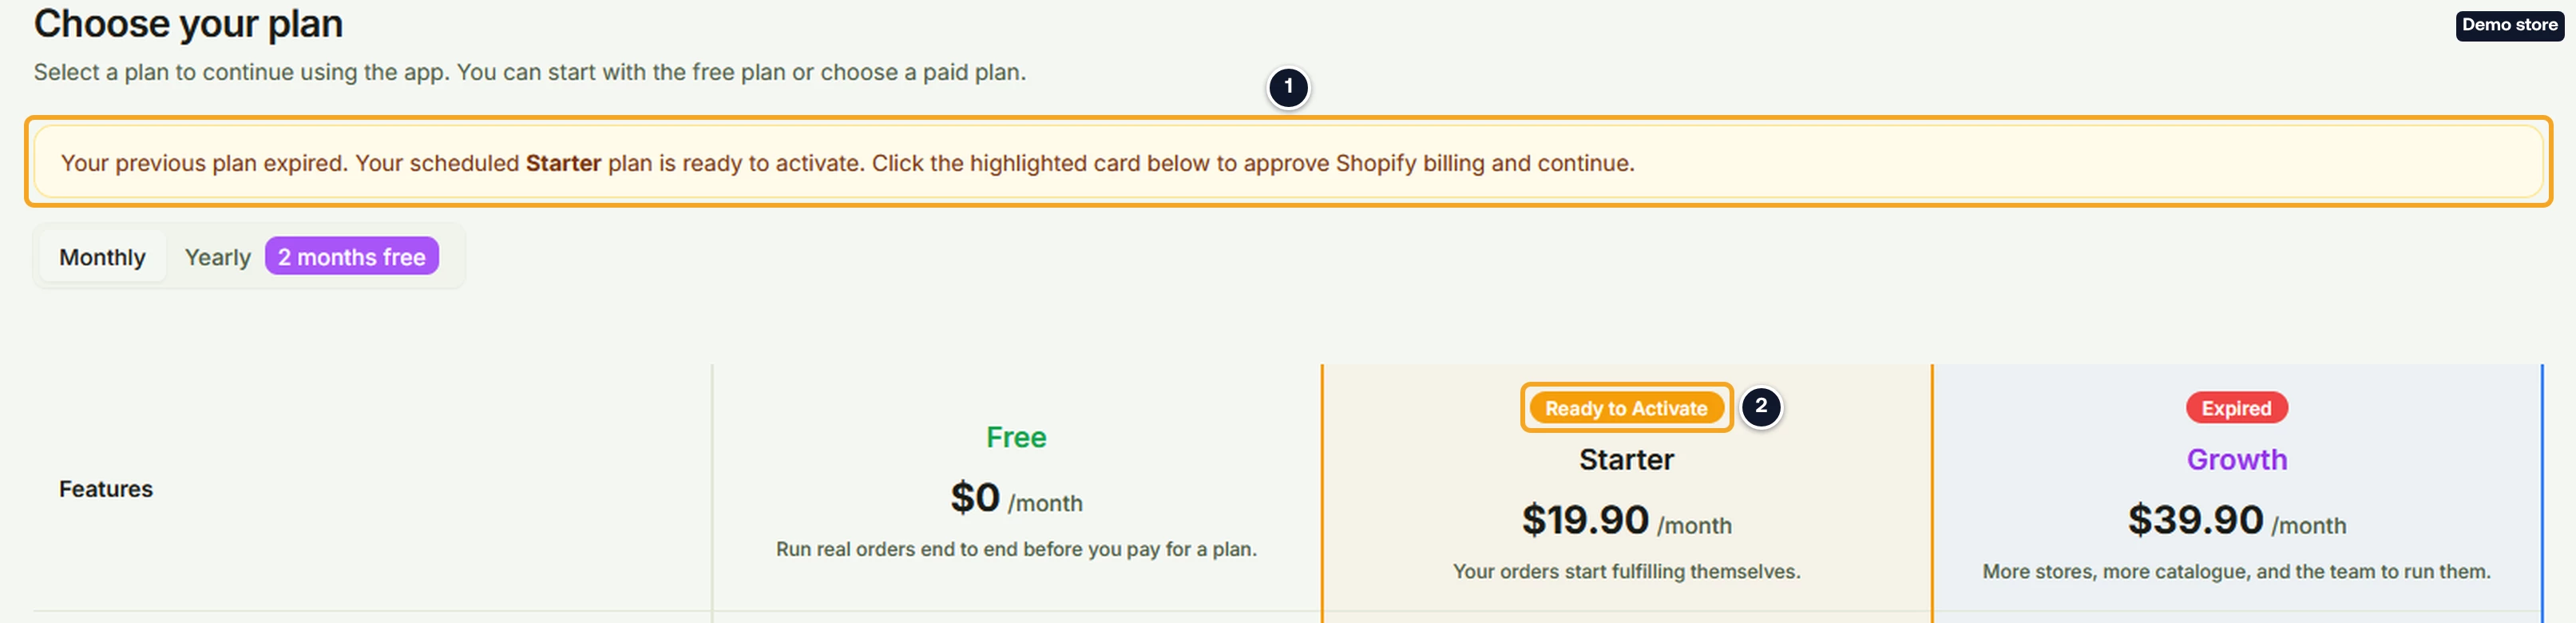
- Shopify opens its own page to approve the lower plan's charge. If DS-Mate has no record of a trial on your account, the trial dialog opens first. If you came through the store and guest steps, there is no dialog, and the charge Shopify shows can start with a 14-day trial that then bills automatically. Check what Shopify's page says before you approve. Approve it there.
- If you went to Shopify without the store steps and still have more stores or guests than the lower plan allows, "Store Limit Exceeded" opens when you come back. Continue below.
If the lower plan is Free
- Click Activate Free. The banner also asks you to approve Shopify billing, but Free has no Shopify charge.
- If your account fits Free, the toast reads "Free plan activated. You can use the app with Free limits." and the Billing page shows. Reload the page, or open DS-Mate again from Shopify Admin > Apps, to load the app menu.
- If your account is over the Free limits (more than 1 store, any guest, or more imported products or linked variants than Free allows), the app refuses with the toast "Failed to activate free plan" and stays on the plans. Activate Free does not open the step where you choose your stores, so the app cannot finish a downgrade to Free while you are over the Free limits.
- To keep a paid plan instead, click its button on the same page: Resubscribe on your old plan, or Downgrade or Upgrade on the other. Shopify opens its page to approve the charge, as in step 10.
- To finish the move to Free instead, sign in (or sign up) at ds-mate.com with the same email.
- Click Activate Free on the plans page. It asks which stores to keep before it activates Free. If you have more imported products than Free allows, Free is refused there too; keep a paid plan instead (step 15).
Choose the stores to keep
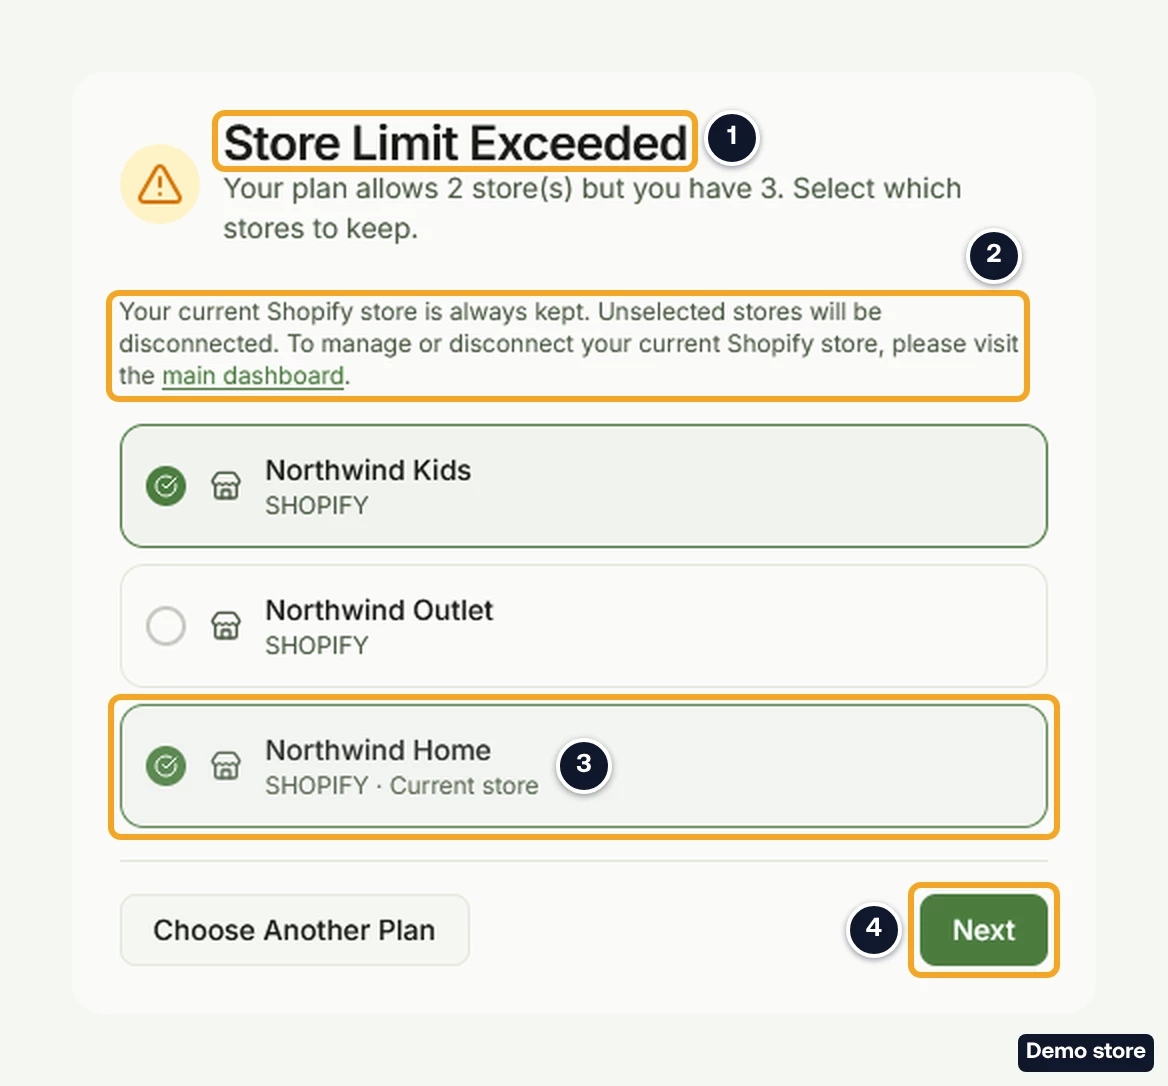
- Read the title "Store Limit Exceeded" and "Your plan allows <max> store(s) but you have <n>. Select which stores to keep."
- Read the note: "Your current Shopify store is always kept. Unselected stores will be disconnected. To manage or disconnect your current Shopify store, please visit the main dashboard."
- Find your stores in the list. Each row shows the store's name, not the label you gave it in DS-Mate (or "Unnamed Store"), then the channel in capitals, such as "SHOPIFY". The store you have open adds "· Current store".
- The store you have open and other stores up to your limit are ticked for you. Tick or untick the others. Clicking the current store shows "Your current Shopify store must be kept"; ticking one store too many shows "You can only keep <max> store(s)".
- Check that the row marked "· Current store" is the store you have open. If another store carries the mark, tick your open store as one of the stores you keep (untick another first if your limit is full), or click Choose Another Plan and finish on ds-mate.com, where no store is pinned. With a limit of 1 store, use Choose Another Plan.
- Click Next. It is dimmed while no store is ticked.
Remove extra guests (only if the app asks)
- Read the title "Guest Limit Exceeded" and "Your plan allows <n> guest(s) but you have <m>. Select at least <k> to remove." The note reads "Only guests on the stores you are keeping are listed. Guests on a store you chose to disconnect are removed with that store."
- Tick the guests to remove until the counter "<x> of <k> selected for removal" reaches the number asked. Each row shows the guest's name or email, then the email and the store name (only the store name when the guest has no name).
- Click Next. It is dimmed until you tick enough guests. Back returns to the store list when that step was shown.
On Growth paid by card, the app can also offer extra slots here. It never offers them on a plan billed through Shopify.
Confirm
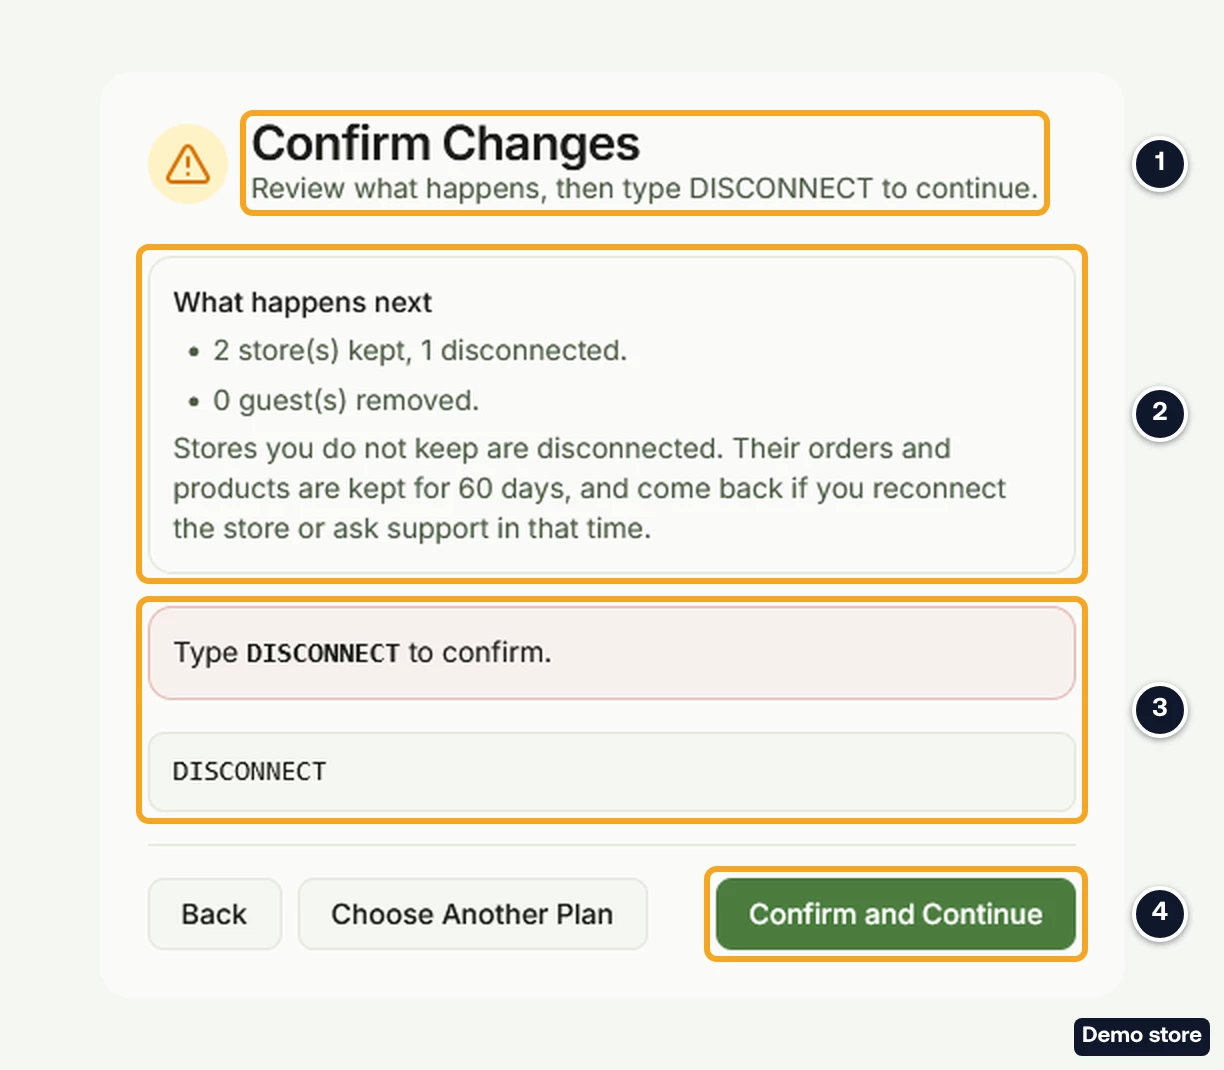
- Read the title "Confirm Changes" and "Review what happens, then type DISCONNECT to continue."
- Check the box "What happens next": "<n> store(s) kept, <m> disconnected." and "<g> guest(s) removed.", with a sentence about the stores you drop.
- Type DISCONNECT in the field "Type DISCONNECT to confirm".
- Click Confirm and Continue. It is dimmed until the word matches exactly, and reads Processing... while it works. Back returns to the step before.
- If these steps opened after Activate <Plan>, Shopify's charge page opens next (step 10). Otherwise the toast reads "Your account is back within your plan limits" and the app opens. If it fails, the toast gives the reason, for example "Cannot keep 3 stores. Starter plan allows 2.", or "Failed to update your account".
Choose another plan instead
- Click Choose Another Plan on the store step or the confirm step. The normal Billing page opens, with Change Plan. Until you are within your limits, every other page still opens Billing.
Good to know
- There is no deadline. Nothing is disconnected by date: the app stays on this screen until you confirm. Stores you do not keep are disconnected: "Stores you do not keep are disconnected. Their orders and products are kept for 60 days, and come back if you reconnect the store or ask support in that time." Their guests are removed with them.
- On a plan billed through Shopify, a scheduled downgrade cannot be undone in the app. Scheduling it cancels your Shopify charge at once, you keep your plan until the effective date, and when a lower paid plan starts you approve it on Shopify again.
Related Articles
Still have questions?
Our support team is ready to help. Reach out and we'll get back to you as soon as possible.